How to Use Landform and Topography in Garden Design
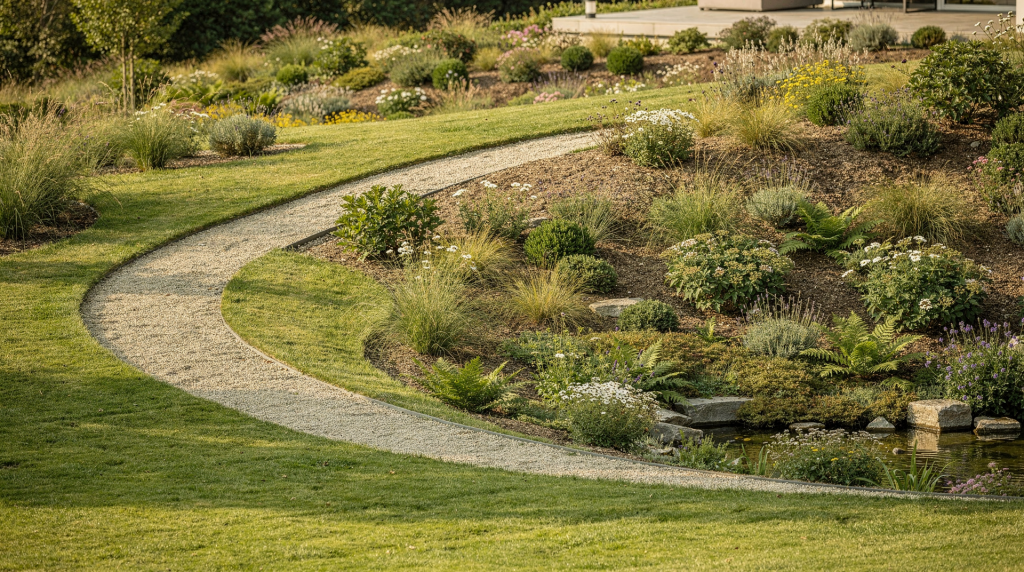
Why topography matters in a garden
Topography is not just about hills and slopes. It includes every change in level, from a subtle rise in a lawn to a retaining wall, terrace, swale, or sunken seating area. At garden scale, even minor level changes can become a major part of the spatial design, often defining steps between outdoor rooms or creating a stronger relationship between house and landscape.
What I’ve observed over years of documenting private gardens is that the most successful sites treat topography as the skeleton beneath the skin of planting and hardscape. A 150mm change in level might seem negligible on a survey drawing, but in reality it’s enough to shift how water moves, where the eye travels, and whether a seating area feels exposed or held. These micro-adjustments are what separate a garden that feels assembled from one that feels inevitable.
Good landform design does three jobs at once:
- It organizes space and circulation.
- It manages water naturally and helps avoid pooling.
- It adds visual interest, scale, and a sense of place.
In other words, landform is both practical and atmospheric. When I walk a site with a designer, the conversation rarely starts with plants. It starts with the ground — where it rises, where it falls, where it holds moisture, and where it feels uncomfortable underfoot. These observations become the armature for everything that follows.
Start by reading the site
Before moving any soil, study the ground as it already exists. Walk the site in rain if possible, or revisit after heavy showers and note where water collects, where it runs, and where it disappears. Look for low points, compacted areas, wet patches, dry ridges, and places where plants are already telling you something about drainage and soil conditions.
I’ve learned to treat these post-rain walks as essential research. The puddles aren’t problems to erase — they’re data. A patch of moss on a north-facing bank, a line of rushes in a lawn hollow, the way gravel washes across a path after a storm: these are the site speaking. The skill is in listening before imposing a solution.
A useful site-reading checklist:
- Identify the high point and lowest point.
- Mark where water pools after rain.
- Note views in and out of the site.
- Find the natural path from house to garden edge.
- Observe where sun, shade, and wind change with level.
- Record any abrupt changes caused by old walls, paths, banks, or building work.
This early observation prevents one of the biggest mistakes in garden grading: forcing a layout onto a site instead of working with the land’s logic. I’ve seen too many gardens where an imported design language sits awkwardly on ground that was never properly understood. The result is always a quiet tension — steps that feel too steep, terraces that don’t quite meet the house at the right level, planting that struggles in soil that should have been left alone.
Understand the main landform options
Gentle grading
Grading means reshaping the ground so it performs better. In domestic gardens, this may be as simple as smoothing awkward hollows, correcting a poor fall away from a building, or creating a more usable lawn plane.
What’s rarely discussed is how grading affects the psychology of a space. A lawn that falls gently away from a terrace draws the eye outward and invites movement. A lawn that tilts back toward the house can feel unsettling — it subtly suggests water running toward foundations, even if the drainage is technically sound. These are the nuances that make grading an art as much as a technical exercise.
Use grading when you need:
- Better drainage around the house.
- Safer, easier circulation.
- A clearer relationship between terrace, lawn, and planting.
- Space for play, seating, or access routes.
Terraces and level changes
Terracing is the most useful response to a slope when you want more flat, usable ground. Instead of fighting the slope, you divide it into usable bands, often with retaining walls or steps between them.
I’ve photographed terraced gardens where each level carries a distinct atmosphere — an upper terrace for morning coffee with views across the valley, a middle level for dining in dappled shade, a lower lawn for children’s play. The retaining walls between them aren’t just structural; they’re thresholds. A well-proportioned terrace sequence creates a rhythm that feels architectural without being rigid.
Terraces are especially effective when:
- A slope is too steep for practical use.
- You want distinct garden rooms.
- The house sits above or below the garden and needs a transition.
- You want to create a structured, architectural look.
Swales and drainage corridors
A swale is a shallow channel that moves surface water safely through the garden. It can be subtle and planting-led rather than engineered and visible. In a well-designed garden, drainage features should look intentional, not like afterthoughts.
The best swales I’ve seen are almost invisible — gentle depressions planted with moisture-tolerant perennials that thrive on the extra water while disguising the drainage function entirely. A swale lined with Iris sibirica, Deschampsia cespitosa, and Lythrum salicaria reads as a deliberate planting feature, not a utility channel. That’s the mark of integrated design: function disappears into form.
Mounds, banks, and sculpted forms
Raising ground level is useful when you want to create shelter, improve privacy, introduce variation to a flat plot, or frame views. Mounds can also help define planting beds or create a softer edge around seating and paths.
On flat sites, even a 400mm mound can transform the experience. It lifts planting into better light, creates a sense of enclosure around a seating area, and breaks the horizon line that makes flat gardens feel exposed. The key is shaping: a mound should rise and fall with the ease of natural topography, not sit on the ground like an afterthought. I often see this done poorly — mounds that look like burial barrows rather than landforms. The difference is in the grading of the edges and the way the form meets the surrounding ground plane.
How landform changes the experience of a garden
A carefully shaped site changes more than drainage. It changes how a garden is read and used.
- Rising ground can make a space feel enclosed and intimate.
- Dropping ground can open up views and create drama.
- A terrace can slow movement and encourage pause.
- A bank can hide a boundary or screen service areas.
- A sunken area can feel protected and calm.
This is why the best landform design is not just technical. It is narrative. It guides the visitor through the site and gives the garden a sequence of revealed moments. I remember a garden in the Cotswolds where the entrance path dipped slightly before rising to reveal the house — that small depression created a moment of compression that made the subsequent opening feel expansive. The level change was barely 300mm, but the emotional effect was profound.
Landform also shapes microclimate. A south-facing bank warms earlier in spring and extends the growing season for Mediterranean plants. A north-facing slope stays cooler and moister, suiting woodland species. A hollow can trap cold air and create a frost pocket — disastrous for early blossom, but potentially useful for plants that need winter chill. These are the quiet ways topography influences what can grow where, long before planting design begins.
A practical method for shaping landform
A simple way to approach landform design is to work from intention to site execution. I’ve refined this sequence over years of watching designers work through the process, and it holds up across projects of every scale.
Step 1: Define the purpose
Ask what the landform must do.
- Solve a drainage problem?
- Improve access?
- Make a flat area for dining or play?
- Create privacy?
- Add scale to a featureless site?
- Connect a contemporary house to a more natural landscape?
Be clear here, because a good landform should always earn its place. Every mound, terrace, and swale needs a reason to exist beyond “it looked interesting on a plan.”
Step 2: Map the existing levels
You need a basic understanding of height changes before making design decisions. Even a rough survey can reveal where the natural flow of water and movement already wants to happen. I’ve worked with designers who mark out level changes with string lines and a laser level over a weekend — the precision doesn’t need to be survey-grade, but the understanding must be real.
Step 3: Sketch the spatial effect
Think in terms of rooms, edges, thresholds, and transitions. A bank can act like a wall. A shallow dip can create a basin. A terrace can behave like an outdoor floor. This is where topography becomes architecture. The language shifts from drainage calculations to spatial composition — and both must work together.
Step 4: Test the massing
For significant changes, model the idea physically or digitally before committing to excavation. The shape matters more than the exact volume. A subtle curve can feel natural; a poor angle can make a garden seem awkward and unresolved. I’ve seen designers use everything from cardboard models to sand trays to test how landforms catch light at different times of day. Shadow studies are particularly revealing — a mound that looks elegant in plan can cast a long, cold shadow across a seating area in winter.
Step 5: Build from the site outward
Landform should be set out and adjusted on site, not treated as a purely paper exercise. The finished shape depends on how the ground looks in reality, how water moves, and how construction details meet planting, hardscape, and boundaries. The best earthworks I’ve seen were refined on the ground with a machine operator who understood the design intent — small adjustments made by eye as the soil settled into place.
Drainage: the non-negotiable part
Any change in level affects water. If the landform looks good but traps water, it will fail. I’ve watched beautiful terraces turn into boggy messes within a season because drainage behind retaining walls was treated as an optional extra rather than a fundamental requirement.
Basic drainage principles to keep in mind:
- Ground should shed water away from buildings.
- Low points must have an intentional outlet.
- Terraces need drainage behind retaining walls.
- Swales should be graded consistently so water moves through them.
- Wet areas should be planted with species suited to moisture, not forced into dry-border planting.
If the site already has a wet area, don’t automatically flatten it. Sometimes the smarter move is to turn it into a planted basin, rain garden, or seasonal feature. A damp hollow planted with Gunnera manicata, Rodgersia, and Matteuccia struthiopteris becomes a lush, dramatic feature rather than a problem to solve. The water isn’t the enemy — poor management of it is.
How to use landform by garden type
| Garden type | Landform strategy | Why it works |
|---|---|---|
| Flat suburban plot | Light grading, raised beds, subtle mounding | Adds structure without overwhelming the space; creates micro-variations that catch light and shadow differently through the day |
| Sloping country garden | Terraces, steps, retaining walls, planted banks | Makes the site usable and visually ordered; each terrace becomes a distinct room with its own relationship to the view |
| Courtyard garden | Small level changes, sunken seating, raised edges | Creates intimacy and enclosure; a sunken area in a courtyard feels like a room without a ceiling |
| Family garden | Broad flat lawn, gentle slopes, drainage channels | Balances playability with water management; gentle slopes are safer for children than abrupt drops |
| Architectural modern garden | Strong geometry, crisp terraces, clean retaining lines | Reinforces the house’s form and materials; the landform becomes an extension of the architectural language |
Common mistakes to avoid
1. Making levels too complicated
More movement in the ground is not always better. Overworked landform can feel busy, expensive, and hard to maintain. Every level change should have a clear job. I’ve visited gardens where the ground undulates so restlessly that you can’t find a comfortable place to stand — the design competes with itself rather than settling into a coherent whole.
2. Ignoring access
A beautiful terrace is useless if it is awkward to reach. Always think about how people actually move through the space, especially with children, tools, furniture, or wheelbarrows. The route from kitchen to compost, from parking to front door, from terrace to lawn — these everyday journeys should feel effortless, not like an obstacle course.
3. Forgetting water
Many grading problems begin when drainage is treated as an afterthought. A good design makes water movement part of the layout from the start. I’ve seen retaining walls fail because no one thought about where the water behind them would go. The repair costs far exceed the cost of designing drainage properly from day one.
4. Forcing a flat solution onto a sloped site
Sometimes a slope is the best thing about a garden. If you flatten everything, you may lose the sense of place that makes the site interesting. A slope gives a garden drama, views, and a natural hierarchy of spaces. Working with it — rather than against it — almost always produces a more distinctive result.
5. Using retaining walls without softening them
Hard edges need planting, material rhythm, or a clear architectural reason. Otherwise they can dominate the garden and feel overbuilt. A retaining wall that runs uninterrupted for twenty meters reads as a barrier. The same wall broken by planting pockets, steps, or changes in material becomes part of the garden’s language.
A simple design framework for real projects
If you are planning a garden redesign, use this sequence:
- Measure the site and understand the levels.
- Mark drainage patterns after rain.
- Decide where you need flat, usable space.
- Identify where height changes can create interest or privacy.
- Keep major level changes tied to structure: terrace, path, wall, step, or planting zone.
- Resolve water management before detailing surfaces and planting.
- Match planting to the new conditions created by the landform.
That order matters. It prevents expensive revisions later. I’ve watched projects where planting was designed before drainage was resolved — the result was beautiful plants dying in waterlogged soil, and a costly replanting exercise that could have been avoided entirely.
Planting and landform should work together
The strongest gardens treat planting and topography as one system. A bank can be planted to hold soil and soften structure. A low area can support moisture-loving plants. A raised edge can become a dry, airy planting zone. The ground shape should help the planting look inevitable, not decorative.
When I photograph gardens, the moments that stay with me are those where planting and landform are so integrated that you can’t imagine one without the other. A sweep of Stipa tenuissima on a dry mound catches the light and moves with the wind in a way that flat planting never could. A drift of Camassia in a damp swale looks like it chose that spot itself.
Useful pairings include:
- Dry banks with drought-tolerant planting — think Euphorbia, Santolina, Lavandula, and Mediterranean sub-shrubs that thrive in free-draining conditions.
- Low swales with moisture-tolerant species — Iris, Ligularia, Persicaria, and grasses that don’t mind wet feet.
- Terraced levels with distinct planting themes — each terrace can carry a different palette that responds to its aspect and microclimate.
- Stepped transitions with repeating plants that unify the design — a signature plant repeated across levels ties the composition together.
When to bring in professional help
Simple grading changes can sometimes be handled during broader landscaping work, but major recontouring, retaining walls, drainage corrections, or structural changes near buildings usually need expert input.
I’ve learned to respect the point at which a project exceeds what can be safely managed without specialist knowledge. Retaining walls over a meter high, drainage systems that connect to mains, any excavation near foundations — these are not DIY territory. The cost of professional advice is almost always less than the cost of fixing a failure.
Get professional help when:
- The slope is steep — generally anything over 1:3 requires careful engineering.
- The site has persistent drainage problems that simple grading can’t solve.
- Retaining structures are needed, especially if they retain significant loads.
- You are changing levels near foundations — even small excavations can affect structural stability.
- The project affects access, safety, or boundary conditions.
FAQ
What is the difference between landform and topography?
Topography describes the existing shape of the land — it’s the raw data of a site survey. Landform is the design response: how that shape is used, altered, or created in the garden. Think of topography as the canvas and landform as the composition you paint onto it.
Can a flat garden still benefit from landform?
Yes. Even shallow mounds, sunken seating, raised beds, or subtle grading can give a flat garden more structure, drainage, and visual depth. On the flattest sites, a 300mm change in level can feel transformative — it creates shadow, defines edges, and breaks the monotony of a single ground plane.
Is terracing only for steep slopes?
No. Terracing can also help define outdoor rooms, create better circulation, and improve the relationship between a house and its garden. Even on gentle slopes, a single terrace can resolve an awkward transition between interior floor level and garden level, making the house feel grounded rather than perched.
What is the biggest mistake in garden grading?
The most common mistake is reshaping the ground without first understanding where water naturally goes. Water has a logic of its own, and ignoring it leads to pooling, erosion, and planting failures that could have been avoided with better observation at the start.
How much level change is enough to matter?
Even very small level changes can be meaningful at garden scale because they affect movement, thresholds, drainage, and the sense of space. A 100mm step between a terrace and a lawn is enough to define the edge, keep surface water off the paving, and create a subtle but clear transition between two different worlds.
Conclusion
Landform is one of the most effective ways to make a garden feel intentional, usable, and connected to its setting. When topography is read carefully and shaped with purpose, it can solve drainage problems, improve circulation, define outdoor rooms, and give even a modest garden a stronger identity. The best results come from treating the ground as part of the architecture, not just the surface under it.
What I’ve come to understand through years of documenting designed landscapes is that the ground plane is never neutral. Every decision about level — whether to raise, lower, terrace, or leave alone — shapes how a garden feels underfoot, how water moves through it, and how people inhabit it. The gardens that stay with me are those where the landform feels so right that you stop noticing it as a design move at all. It simply feels like the place was always meant to be shaped that way.