Creating Garden Rooms with Walls, Hedges, and Changes in Level
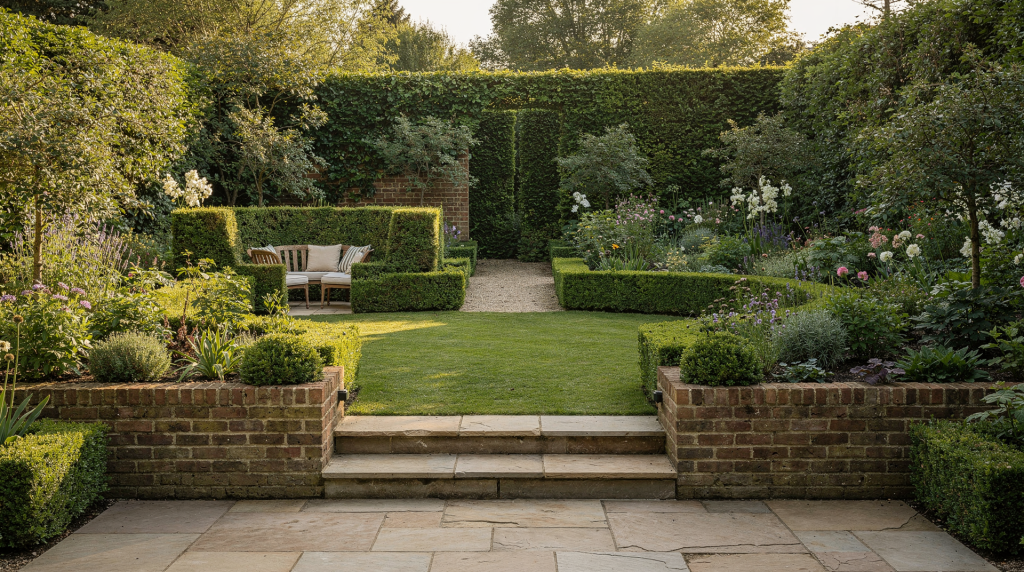
What a garden room actually is
A garden room is not a metaphor. It is a distinct outdoor compartment with its own function, its own atmosphere, and a clear sense of enclosure. The term gets used loosely—sometimes for any corner with a bench—but in a well-planned garden, a room behaves much like an interior space. It has edges you feel, a floor you stand on, and a reason for being there.
One room might be for dining, another for quiet morning coffee, a third for growing cut flowers. What matters is that each space reads as a separate destination, not an afterthought. The garden stops being a single open expanse and starts working as a sequence of places. Thresholds appear. Movement slows. The eye stops scanning and starts settling.
In practical terms, a good garden room usually has:
- A clear boundary—something that says this space is different from the next
- A floor surface or ground condition—stone, gravel, lawn, decking, even beaten earth
- A focal point or purpose—a table, a fire pit, a long view, a specimen tree
- A transition in or out—a step, an opening, a shift in material
- Enough enclosure to feel deliberate, but not so much that the space feels claustrophobic
The balance is delicate. Too little enclosure and the room dissolves into the wider garden; too much and it feels like a pen. The best garden rooms hold you without trapping you.
Why use walls, hedges, and changes in level
These three elements form the backbone of outdoor spatial design because each defines space in a fundamentally different way. A wall stops the eye and the body. A hedge filters both. A change in level shifts your physical relationship to the ground, which your body registers before your mind does.
Used in isolation, any one of them can feel one-dimensional. A garden of only walls reads as hard and architectural; a garden of only hedges can feel amorphous; a garden shaped purely by terracing can become an engineering exercise. The magic happens in combination.
| Element | Best use | Strengths | Limitations |
|---|---|---|---|
| Walls | Strong definition, shelter, privacy | Immediate structure, good in formal schemes | Permanent, can feel hard if overused |
| Hedges | Softer enclosure and green boundaries | Seasonal texture, privacy, natural feel | Need time and maintenance |
| Changes in level | Separation without heavy screening | Adds depth, drama, and circulation | Can increase cost and complexity |
Layering is the goal. A low brick wall might give a terrace its crisp edge, a yew hedge behind it might block a neighboring window, and two broad steps down to the lawn might mark the transition from dining to open ground. Each element does a different job, and together they create a spatial experience that feels richer than any single device could achieve alone.
Start with use, not decoration
I have seen too many gardens where the walls and hedges came first, drawn on a plan as satisfying geometry, and the question of how people would actually live in the space came later. The result is almost always a garden that photographs well but frustrates in daily life.
Before you place a single brick or order a hedge plant, work out what each room is for. Be specific. A dining terrace used three times a week in summer needs hard-wearing stone, shelter from the prevailing wind, and proximity to the kitchen door. A reading corner used on quiet mornings needs dappled shade, a sense of enclosure, and a surface that stays dry underfoot. These are different briefs, and they demand different treatments.
Ask these questions for every zone:
- What is this space for?
- Who will use it?
- How often will it be used?
- Does it need privacy, sun, shelter, or views?
- Should it feel formal, relaxed, enclosed, or open?
The answers will steer every decision that follows—from the height of a hedge to the width of a step. Function is not the enemy of beauty; it is the scaffold that beauty grows on.
How to divide a garden into rooms
The most successful garden rooms feel connected, not chopped up. The goal is not to partition the garden into isolated cells but to create a sequence where each space flows naturally into the next. Think in terms of transitions, not barriers.
1. Identify the main outdoor functions
Start by listing what needs to happen in the garden. Typical functions include:
- Dining
- Sitting
- Entertaining
- Growing vegetables or herbs
- Play
- Quiet retreat
- Arrival or circulation
Be honest about your list. A garden does not need to do everything. Three well-defined rooms that get used daily are worth far more than six that exist only on paper.
2. Position the principal room close to the house
The room nearest the house carries the most daily use, so it deserves the most attention. A terrace outside the kitchen or living room often works best as the main outdoor living room—the place where meals happen, where guests gather, where you step out with a cup of tea and pause. Keep this space generous, well-drained, and visually tied to the interior through aligned doors, consistent materials, or a shared axis.
3. Place secondary rooms deeper into the garden
Further spaces can afford to be more private, more seasonal, or more specialized. A kitchen garden might sit behind a hornbeam hedge. A fire pit area might nestle at the garden’s far end, reached by a grass path. This creates a sense of progression—a journey from the public, everyday zone into something quieter and more secluded.
4. Use thresholds between spaces
Thresholds are the punctuation marks of a garden. They tell the body that one room is ending and another is beginning. They can be:
- Steps—a single riser or a short flight
- Openings in hedges—a clipped gap, an arch, a dark portal through yew
- Arches or pergolas—overhead structure that compresses space before releasing it
- Narrow paths—a deliberate squeeze between planting
- Changes in paving—stone giving way to gravel, brick to lawn
- Low walls or planted transitions—a line of lavender, a stone edge, a change in ground cover
These moments matter disproportionately. A well-handled threshold makes the garden feel composed. A missing one makes it feel like a collection of unrelated patches.
Walls: when hard structure is the right answer
Walls are the fastest way to give a garden form. They arrive fully formed, unlike a hedge that needs years to mature, and they bring an architectural weight that planting alone cannot supply. They suit sites where privacy, wind protection, or a strong visual anchor is needed from day one.
Best uses for walls
- Terracing a slope—retaining walls turn an unusable gradient into flat, livable ground
- Creating a sheltered dining court—a walled enclosure holds heat and blocks wind, extending the outdoor season
- Giving a garden a formal backbone—low walls can frame axes, reinforce symmetry, or anchor a geometric layout
- Screening service areas—bins, compost, bike storage disappear behind a well-placed wall
- Framing views or courtyards—a wall can act like a picture frame, directing the eye to a specific tree, sculpture, or borrowed landscape
Materials that work well
- Brick—warm, familiar, and excellent for continuity with traditional houses. A brick garden wall that matches the house ties the two realms together without effort.
- Stone—permanence and texture. Local stone embeds the garden in its region and weathers beautifully.
- Rendered masonry—cleaner and more contemporary. A smooth, pale render can make a small courtyard feel larger by reflecting light.
- Timber or timber-clad retaining structures—softer and warmer in modern schemes, though they need more maintenance over time.
Design tips
- Keep wall height proportionate to the space. A two-metre wall in a small garden can feel oppressive; a knee-high wall in a large one can feel pointless.
- Use low walls to define without blocking light. Even a 400mm brick edge can separate a terrace from planting without casting deep shadow.
- Combine walls with planting to avoid a hard, closed feel. A wall softened by trailing rosemary, espaliered fruit, or a border at its base reads as a garden element, not a barrier.
- Repeat house materials where possible. The garden should feel like an extension of the architecture, not a separate project.
Common mistakes with walls
- Building them too high and losing the sense of openness that makes a garden feel generous
- Using too many different materials—brick here, stone there, render elsewhere—which fragments the garden’s identity
- Forgetting drainage in retaining walls—water pressure behind a wall can cause failure within a few seasons
- Creating dead corners that are hard to plant or maintain—narrow, shaded slivers where nothing grows and debris collects
Hedges: the best tool for soft enclosure
If walls are the skeleton of a garden, hedges are its breath. They define space while keeping the garden alive, seasonal, and responsive to light and weather. A hedge is never the same twice: it changes with the month, the angle of the sun, the weight of rain on its leaves. That mutability is its greatest strength.
Good hedge choices
In English gardens, the most useful hedges are those that hold structure through the year and respond well to clipping. The choice of species shapes the character of the room as much as its dimensions do.
Common examples include:
- Yew (Taxus baccata)—for formal, deep green structure. Slow-growing but worth the wait. A clipped yew hedge reads as architecture in leaf form.
- Beech (Fagus sylvatica)—for seasonal change and dense screening. Holds its copper winter leaves until spring, giving year-round enclosure.
- Hornbeam (Carpinus betulus)—for a lighter texture and reliable enclosure. Similar to beech but happier on heavier soils.
- Privet (Ligustrum)—for quick shaping in mixed or traditional gardens. Fast, forgiving, and unfashionably useful.
- Box (Buxus sempervirens)—in smaller-scale schemes, though it needs careful maintenance and may not suit every site, especially where box blight is a risk.
Where hedges work best
- Around a lawn room—a green-walled space for sitting or playing
- As a boundary to a kitchen garden—structured but not sterile
- As a soft screen near seating areas—privacy without the hardness of masonry
- To separate a family area from a quieter retreat—children’s play on one side, adult calm on the other
- As a transition between open and enclosed spaces—a hedge portal that compresses the view before releasing it into a wider landscape
Design tips
- Let hedges do the enclosing, but not all the visual work. Pair them with looser planting nearby so the garden does not feel like a corridor of green walls.
- Mix clipped structure with looser planting nearby—a formal hedge fronted by billowing perennials creates tension and depth.
- Use openings carefully so movement feels intentional. A gap in a hedge should lead somewhere, not just interrupt the line.
- Keep hedge lines clean and simple if the house architecture is strong. A fussy, over-shaped hedge fights a crisp modern facade.
Common mistakes with hedges
- Choosing species that are too slow for the budget or timeline—yew is wonderful, but if you need privacy in two years, it is the wrong choice
- Planting too thinly and expecting instant screening—hedge plants need proper spacing and several growing seasons to knit together
- Allowing hedges to become too wide for the available space—a hedge that steals two metres from a small garden is a liability
- Ignoring shade and root competition near mature trees or walls—hedges struggle in dry, root-filled soil and thin out over time
Changes in level: the most underrated room divider
A change in level is one of the most elegant ways to create a garden room because it works on the body, not just the eye. You do not simply see the separation; you feel it in your legs as you step up or down. That physical shift registers as a change of place more powerfully than any visual cue.
Even a modest rise or fall—two or three risers—can signal that a space has changed function. The terrace becomes a platform. The lawn becomes a lower room. The garden gains a third dimension.
Best uses for level changes
- Raising a dining terrace above a lawn—the diners gain a view, and the terrace feels like a stage
- Sinking a seating area for intimacy—a sunken fire pit or conversation pit feels sheltered and cocooning
- Terracing a sloping garden—turning a difficult gradient into a series of flat, usable planes
- Creating a pause between public and private zones—a few steps down into a quieter part of the garden
- Improving views from upper or lower levels—raising a viewpoint or dropping a path to frame a borrowed landscape
How much level change is enough?
The change needs to feel deliberate. A tiny adjustment—a single 100mm step—may read as accidental, a trip hazard rather than a design move. A clear step or tier reads as intentional.
A practical rule:
- Small changes (150–300mm) suit subtle transitions between rooms
- Larger level shifts (450mm and above) suit more formal or dramatic separation
- Steps should always feel safe, comfortable, and obvious—generous treads, consistent risers, good lighting if used at night
Design tips
- Use level changes to improve the experience of views—raising a terrace by even 300mm can lift sightlines over a hedge or fence
- Make steps wide and calm, not cramped—a broad flight of three steps feels luxurious; a narrow one feels mean
- Align terraces with doors, windows, or axial views where possible—the geometry of the house should flow into the garden
- Keep transitions simple if the garden is small—a single terrace step may be all the level change a compact space can absorb
Common mistakes with level changes
- Overcomplicating a slope with too many tiny platforms—a staircase of miniature terraces feels restless and is hard to furnish or use
- Forgetting how water will drain—every level change redirects surface water, and poor drainage leads to boggy patches or eroded steps
- Creating awkward step positions that interrupt movement—steps placed across a natural desire line force people to detour or trip
- Using too many materials across each level, which weakens the sense of unity—a stone terrace, a brick step, and a gravel path feel like three different gardens
Combining all three: the most effective approach
The strongest gardens I have documented rarely rely on one device alone. They combine walls, hedges, and level changes so that each element does what it does best, and the whole composition feels layered and resolved.
Consider a typical arrangement: a stone retaining wall holds a raised dining terrace, giving it structure and a crisp edge. A yew hedge runs along the back of the terrace, screening a neighboring house and providing a dark, still backdrop for planting. Two broad stone steps lead down from the terrace to a lawn, marking the transition from dining to open ground. The wall provides strength, the hedge adds softness and privacy, and the level change gives the garden rhythm and depth.
This layering does more than define space. It makes the garden feel larger, because the eye travels through a sequence of spaces instead of stopping at a single boundary. It also makes the garden feel more connected to the house, because the architectural language of the wall and the terrace echoes the built form, while the hedge and the lawn keep the garden alive and seasonal.
A practical framework for planning garden rooms
If you are starting from scratch or reworking an existing garden, a methodical approach saves money, time, and regret. Here is a step-by-step process I have seen work repeatedly on sites of all sizes.
Step 1: Map the site
Mark everything that exists and everything that matters:
- House doors and windows—these dictate the primary connections between inside and out
- Existing trees and shrubs—what stays, what goes, what casts shade
- Sun and shade patterns—track them through the day and across seasons
- Views you want to keep—a distant hill, a church spire, a beautiful tree
- Views you want to block—a neighboring window, a road, an unsightly shed
- Slope, drainage, and awkward corners—the constraints that will shape your decisions
Step 2: Decide the main route through the garden
The route should feel natural, not forced. People tend to walk where the ground invites them. Avoid narrow passages unless the squeeze is intentional—a deliberate compression before a view opens out. The main path should be wide enough for two people to walk side by side, and it should connect the primary rooms without dead ends or awkward detours.
Step 3: Assign a purpose to each room
Give every zone a job. Be specific:
- Outdoor dining—near the kitchen, sheltered, hard-surfaced
- Quiet sitting—secluded, shaded in summer, with a view or a focal point
- Planting and growing—sunny, accessible for maintenance, possibly screened
- Play—visible from the house, soft-surfaced, safely enclosed
- Transition or circulation—the paths and thresholds that link everything else
Step 4: Choose the right boundary type
Use the following logic to decide between walls, hedges, and level changes:
- Need instant privacy? Use a wall or a dense, mature hedge
- Need a softer edge? Use planting or a mixed structure—hedge with loose shrubs in front
- Need spatial separation on a slope? Use level changes—terracing is the most natural response to a gradient
- Need all three? Combine them carefully, but keep the material and plant palette limited so the garden reads as one composition
Step 5: Connect the rooms
Make sure one room leads clearly to the next. Good transitions are one of the biggest signs of a well-designed garden. Walk the route in your mind—or better, mark it out on the ground with canes and string—and check that each threshold feels intentional. If a transition feels awkward on paper, it will feel worse in real life.
What to check before building
Before committing to walls, hedges, or level changes, review these practical points. They are the unglamorous details that determine whether a design thrives or fails:
- Drainage on slopes and retaining structures—where will water go? A retaining wall without weep holes or a gravel drain behind it is a future problem.
- Access for construction and maintenance—can a digger reach the site? Can you get a wheelbarrow through for annual mulch?
- Mature size of planting—that tiny yew in a pot will become a substantial tree if left unclipped. Plan for its adult dimensions.
- Shade from walls, buildings, and trees—a wall that casts a metre of permanent shade changes what can grow at its base.
- Visibility from the house—what will you see from the kitchen window? A beautiful hedge or a blank wall?
- Safety around steps and drops—especially important in gardens used by children or older people. Lighting, handrails, and clear sightlines matter.
- Planning restrictions if walls or earthworks are substantial—check local regulations before building anything over a metre high or making significant changes to ground levels.
- Long-term upkeep of hedges and planting—who will clip the yew twice a year? Can you reach the top without scaffolding?
The best planting to support garden rooms
Planting should reinforce the room, not compete with it. The walls, hedges, and levels provide the architecture; the plants provide the atmosphere, the seasonal change, and the softness that makes a garden feel like a garden rather than an outdoor building.
Useful planting roles
- Structural planting for boundaries—hedges, clipped shrubs, pleached trees that define edges
- Seasonal planting to soften hard edges—perennials and grasses that spill over the foot of a wall or the riser of a step
- Repetition planting to link separate rooms—the same plant repeated in different rooms creates a visual thread that ties the garden together
- Low planting to lead the eye—ground cover or low grasses that sweep across the floor of a room and guide the gaze toward a focal point
- Tall planting to filter rather than block views—transparent plants like verbena, tall grasses, or multi-stem trees that create a scrim rather than a solid screen
A simple planting formula
I often use a four-layer approach when planting garden rooms:
- Structure: hedges, clipped shrubs, small trees—the permanent framework
- Middle layer: flowering shrubs or repeated perennials—the seasonal heart of the room
- Ground layer: low planting that tidies edges and covers soil—lavender, catmint, geraniums, or ground-cover roses
- Accent layer: specimen plants at turns, thresholds, or focal points—a single angelica, a potted agave, a multi-stem amelanchier that catches the light
This layering mirrors the spatial layering of the rooms themselves. Structure, middle, ground, accent—each layer does a different job, and together they create a planting that feels full, intentional, and alive across the seasons.
Typical mistakes to avoid
Over years of visiting private gardens, I have seen the same mistakes surface again and again. They are rarely about budget; they are almost always about clarity of intent:
- Making every space feel equally important—a garden needs hierarchy. One room should dominate; others should support it.
- Using too many boundary types in one small garden—a wall, a hedge, a fence, and a trellis in a single view feel chaotic
- Forgetting how people actually move outside—the route from the kitchen to the compost bin matters as much as the ceremonial axis
- Building walls or terraces before solving drainage—water always wins. Sort the hydrology first.
- Choosing hedges without considering maintenance—a fast-growing hedge needs clipping three times a year. Are you prepared for that?
- Creating rooms that look good in plan but feel awkward on the ground—always test layouts at full scale before committing
- Blocking every view and losing connection to the wider landscape—a garden room should feel sheltered, not imprisoned
A simple design checklist
Before you finalize a design, run through this checklist. It catches the most common weaknesses:
- Does each room have a clear purpose?
- Is there a strong but appropriate boundary?
- Do transitions feel intentional?
- Is the house linked to the garden visually and physically?
- Have walls, hedges, and levels been used for function as well as style?
- Will the layout still work in five or ten years—when the hedge has filled out, when the tree has matured, when your needs have shifted?
When this approach works best
Creating garden rooms is not a universal solution. It works brilliantly in some situations and feels forced in others. The approach is especially effective when:
- The garden is large enough to benefit from structure—a space that feels too big, too open, or too shapeless
- The site feels too open or exposed—wind, overlooking, or a lack of enclosure make the garden uncomfortable
- The house needs a stronger connection to the landscape—the garden currently feels disconnected, a separate entity rather than an extension of the home
- A slope offers the chance to terrace the space—gradients are opportunities, not obstacles
- Privacy is needed without building a fully enclosed yard—partial enclosure through hedges and level changes feels more generous than high walls on all sides
- You want the garden to feel more like a sequence of experiences than a single lawn—a journey rather than a panorama
Conclusion
Garden rooms bring order, atmosphere, and purpose to outdoor space. Walls provide strength and immediacy. Hedges add softness, seasonality, and a living texture that changes with the light. Changes in level give the garden rhythm and depth, engaging the body as well as the eye. When these elements are planned together—each doing its own job, each supporting the others—the result is a garden that feels both practical and memorable.
The best designs are not overcomplicated. They are clear, proportionate, and tied to how the garden will actually be used. They respect the architecture of the house and the character of the wider landscape. If each room has a function and each transition feels deliberate, the whole garden begins to work like a well-composed extension of the home—a series of outdoor spaces that feel as considered and as livable as the rooms inside.
FAQ
What is the easiest way to create a garden room?
A hedge or low wall is often the simplest starting point, especially if you want quick definition without redesigning the whole site. A single line of yew or a knee-high brick edge can establish a room in a weekend, and you can refine from there.
Are garden rooms only suitable for large gardens?
No. Even a small garden can benefit from one or two clearly defined zones, especially if the boundaries are light and the transitions are simple. A tiny courtyard can have a dining corner and a planting corner separated by a change in paving or a low hedge.
Do garden rooms need to be fully enclosed?
No. They only need enough definition to feel distinct. Partial enclosure—a hedge on two sides, a wall on one, an open view on the fourth—often works better than full enclosure, which can feel claustrophobic.
What is better for privacy: walls or hedges?
Walls give instant privacy. Hedges feel softer and more natural, but they take time to establish. If you need privacy immediately, build a wall and plant a hedge in front of it; over time, the hedge will soften the wall and take over the screening role.
Can level changes make a small garden feel bigger?
Yes. A slight rise, drop, or terrace can add depth and create the impression of more than one space. The garden stops reading as a single flat rectangle and starts feeling like a sequence of places.
Should all garden rooms have the same style?
Not necessarily. They should feel connected through materials, planting, or proportion—a thread of continuity that runs through the garden—but each room can have its own character. A formal dining terrace can sit alongside a looser, wilder planting room if the transitions are handled well and the material palette remains consistent.